April 24th, 2021
How Can We Help?
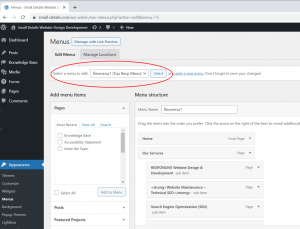
This is really the final step of the “New Page” process and although it’s not difficult, it involves multiple steps (see also Site Navigation…). To the right you’ll see a screenshot of a typical Menu panel. To reach this area from the Dashboard, mouseover the subtitle “Appearance” and select “Menus.”
The top “Edit Menus” tab will be selected by default. Right below you’ll see a pull-down menu (we’ve circled in red), which will display all of the CUSTOM menus included on your website. Each menu label should offer a clue as to where it appears on the site (ex. “Top Resp [responsive] Menu”) but if you have questions about the appropriate menu please get in touch. For the sake of demonstrating we’ll continue to use “flexmenu1” from the example. If you’ve changed the item in the dropdown, click the “Select” button to the right.
You will now see a list of pages currently included (see “Menu structure”). If we’ve used topics and subtopics on your site, these pages will appear to be staggered or “indented” (See the “RESPONSIVE Website…” link tab in the screenshot example above). This is the case when a page is a “Child” (or subtopic) of a “Parent” (topic) page. Read MORE on Parent/Child pages.
Next, to the left of Menu structure you’ll see the complete list of “Pages” on your website (“Add menu items“), broken down into “Most Recent” (additions), “View All” – both will be indented for Parent/Child pages — and “Search,” which is helpful for larger websites with a greater number of pages. To add your page to the menu select it by checking it from the Most Recent or “View All” lists. If necessary, use the Search feature and check the page from there.
Once the page has been added you can drag and drop it into the appropriate location in the menu. If it is a CHILD page, remember to indent by dragging it slightly to the right. When you’re satisfied with the menu structure click the blue “Save Menu” button. It’s a good idea to check your “live” website in another web browser window (right click on your internet browser desktop or task tray icon) but be sure to keep the Dashboard tab/window open on the side or minimized for any additional editing needs. Check to make sure your menu doesn’t overlap or appear out of alignment in any way.
You’re all set.