April 24th, 2021
How Can We Help?
 There are dozens of WordPress image gallery options including a few designed to integrate with Elementor (more on Elementor here). Today we’ll cover two plugins we found useful and effective.
These guidelines are designed for client admin as opposed to developer installation. Please keep in mind these are (paid – pro) plugins. Get in touch if you’re interested in adding a gallery to your website!
“Wonder Grid Gallery Pro” – HOW TO Manage
Wonder’s Grid Gallery is unique in that it supports images, YouTube Vimeo, and HTML5 videos, PDF’s, posts, WooCommerce products, custom post types and custom HTML codes. It’s responsive (for mobile and tablet) and fairly user friendly with loads of options.
 Dashboard → Wonder Grid Gallery Pro → Manage Galleries
- Locate the appropriate gallery in the list, and click the “Edit” link under the gallery ID (on mouseover).
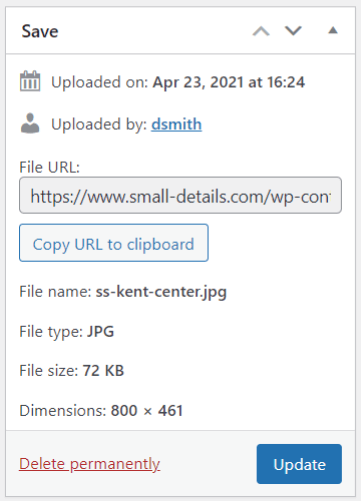
- You’ll see the group of gallery images currently displayed. It’s helpful if you can determine the appropriate image size for any new images you wish to include. To do that click on the “Edit” link under any one of the images. From the top “Image URL” field highlight and copy the link. Paste it into Notepad or Word and make note of the image name at the end of that URL (ex. “…/ss-kent-center.jpg”). Next, open your Media Library and type that image name into the “Search” field, top/right. The image should appear in the list. Click for details and you’ll see a panel similar to our screenshot (right or above). Make note of your image “Dimensions” (in this case 800 x 461 px). This is the approximate size your new image should also be.
- To ADD a new image, (from “Manage Galleries” → “Images & Videos” tab) click the first (“Add Image”) button in the row of the Gallery Editor white buttons. A new panel will open:
- Image URL – To upload a new image from your computer OR to access a file you’ve already uploaded, click the top, right “Upload” button.
- Media Library – Select your image from the library or click the “Upload files” tab in the upper left.
- “Add Image” – blue button in the lower right.
- The image path will now populate the Image and Thumbnail fields. Scroll down and make any desired changes to the Title.
- You can also add a Description, which may come into play if you’re using a skin (theme) with a visible description. Keep in mind there is generally a limited amount of space for a description.
- “Img alt text” is always a good idea for the browsers (as well as for the search engines and ADA compliance).
- Add Button text and a Button link if you plan to use a button in the description.
- If you want the image to be linked to a page or other website, click the Lightbox tab.
- By default images will open in a a separate panel called a “lightbox.” If you wish to have the image link to a different page on your site or on another website, uncheck “Open current image in Lightbox” and add the full URL to the “Click to open web link” field. BE SURE to select the link target below by using the first option “_blank.”
- That should do it unless you wish to add social media or if this is a video (see Video…) – CLICK “OK” (blue button).
- At this point you should see the new image at the very end of your image group. To move it to another position in the list you can generally drag/drop. If you have a large number of images you might need the “Move Up | Move Down” option located under the Edit and Delete links.
- When you’re satisfied, click blue “Save & Publish” (top/right).
- That’s it!
For more detailed Wonder Grid Gallery documentation, visit their website.
“NextGen” Photo Album/Gallery – HOW TO Manage
With over 700,000 installations, NextGen Gallery has been around for a long time (developed in 2007). It’s popular among photographers and great for websites with a focus on photo quality.
- To view/manage the new PHOTO ALBUM, Dashboard → NextGen Gallery → Manage Galleries → “Photo-album.”
- To add an image, click Gallery → “Add Gallery / Images”
- At the top, select from the Gallery pulldown “photo-album”
- Click “+Add Files” button; After files have been selected from your computer click “Start Upload” button (REMINDER 2MB limit)
- Once image(s) are uploaded they can be sorted/rearranged by clicking the “Sort Gallery” button near the top of the image list. After you’ve clicked you’ll be able to drag and drop. Be sure to SAVE any changes.
For more information about Next Gen Gallery, click here.