April 30th, 2021
How Can We Help?
Scheduling events, sessions or other “bookable product” with WooCommerce and “Bookings and Appointments” by PluginHive.
By Michele May — This 5-star plugin has a lot to offer and it’s user-friendly interface made it a great fit for our client. Cost is $99/year for a single site (check for updated pricing!) and we found their support was worth the expense — prompt and helpful. This is unsolicited btw.
The plugin integrates well with WooCommerce and together they provide a full-service booking platform for your website. Below you’ll find settings and other helpful notes based on our experience with this plugin. First we provide the WooCommerce settings you’ll need to be familiar with when setting up an Event or other “Bookable Product.”
ADDING BOOKABLE PRODUCTS & SERVICES
1. WooCommerce → Products → Add New from the Dashboard, left side. On this screen, you’ll enter the name of the product/service along with a description. This will display at the bottom of the individual/single product/service page under the Description heading.
2. Below this you’ll see a field to enter a Short Description. This description displays at the top of the page next to the product.
3. Scroll down to the Product Data box (see screenshot below). Across the top of the box, you will select the type of product from the dropdown and indicate whether it is a virtual product (i.e., no physical product) or a downloadable product.
Bookable Products

Bookable products are entered similarly to simple products until you get to the Product Data section (see above). Select “Bookable product.” You will to keep Virtual box checked.
Product Data Tabs: Bookings Tab
Once you’ve selected Bookable Products from the dropdown, a new set of tabs will appear.
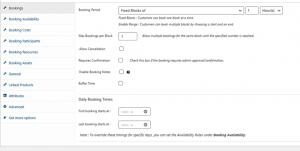
Booking Period: Depending on your available products/services you may want to keep this at “Fixed Blocks of 1 Hour(s).” The dropdowns have other options, should different offerings apply.
Max Bookings per (time) Block: This will remain at “1” unless you allow multiple clients to book the same time slot.
Allow Cancellation: If this is checked, customers will able to cancel their session on their account page, which they will be directed to after registering and making a purchase. If a customer cancels, you will receive an emailed notification, and you should be able to issue a refund through Woocommerce.
Require Confirmation: Checking this box means that the customer does not pay anything until you log in as the administrator and approve the request. Once approved, the customer receives an email with an invoice/link to pay. The payment is made through their account page.
Enable Booking Notes: If this is checked, the booking slots on the calendar will have a small text area added for the customer to include any notes they might have to the seller.
Buffer Time: You can set a certain amount of time to be added both before and after individual bookings to give the seller a gap between appointments.
Daily Booking Times: You can enter times for when you want bookings to begin and end. This isn’t necessary if your service sessions/blocks are set up for specific days and times year-round.
Booking Availability Tab
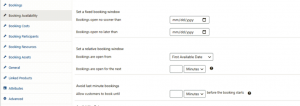
Set a fixed booking window: This would be used to set up a fixed time period that a product/service can be purchased. It would not be available outside that time period (e.g., a limited edition product that is only available for a few days).
Set a relative booking window: You can add a time period to set the availability that will change based on the current date. For instance, you could tell bookings to be open for 5 days after an offering becomes available.
Avoid last minute bookings: This would disable ordering of a product during whatever time frame you set. So if you had bookings available from 9 to 5, you can tell the system to stop taking orders at 4:50.
Availability Rules
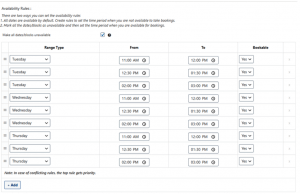
Availability Rules are used to set up the time slots your clients could select from. This can be set up in one of two ways:
- Consider all dates available by default, and only add the dates you want bookings to be unavailable.
- Consider all dates unavailable by default, and only add the dates you want bookings to be available.
TIME OFF
For those times when you plan to be unavailable for ongoing sessions/events, we’ve had some success using Booking Availability Rules and the following settings:
11.3 “You can make the calendar dates/times available or unavailable to book based on your availability.
Product Settings → Bookings → Booking Availability → Availability Rules.
You can create availability rules in two ways.
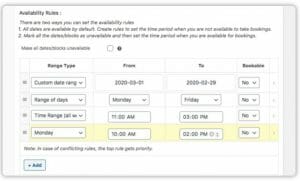
Click for more detail All dates are available by default so you can set only the rules for the dates you are unavailable by using “Bookable = No”.
- Make all dates unavailable by checking this option “Make all dates unavailable” and then create rules for the days you are available by using “Bookable = Yes”.
Custom Date Range Rule: Define a date range by choosing a start date and an end date when you are available or not available to take bookings. For eg: Bookings are closed between April 1, 2020, to April 10, 2020, or Bookings are closed on May 5th.
Range of Days: Define the days or range of days when bookings are closed/open by choosing the start day and end day. For eg: Bookings are closed every Monday (choose Monday to Monday) or Bookings are closed from Saturday to Sunday.
Range of Months: Define the month or range of months when bookings are closed/open by choosing the start month and end month. For eg: Bookings are closed in December (choose December to December) or Bookings are closed from December to February.
Time Ranges: Below rules are applicable for the time-based calendar.
Time Range (All Week): Define the time slots for which bookings are open or closed on all the days by selecting the start time and the end time. For eg: Bookings are closed on all days from 12:00 pm to 2:00 pm.
Weekday: Define the time slots for which bookings are open or closed on a specific weekday by selecting the start time and the end time. For eg: Bookings are closed on all Sundays from 12:00 pm to 7:00 pm.
Custom Date Range With Time Rule: Define a specific date and start time and end time or a start date and start time and end date and time when you are available or not available to take bookings. For eg: Bookings are closed on May 1st, 2020 between 3:00 pm and 6:00 pm or Bookings are closed from May 1st, 2020 3:00 pm to May 10th, 2020 3:00 pm.
SPECIAL NOTE: If you need to set availability for all products/services across your site, visit: Bookings → Settings → Global Availability”
Booking Costs
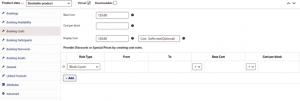
Base Cost and Display Cost: For your products, these fields will be the same. The only different is the Display Cost will be shown on the front end of the website, and you can add an optional Cost Suffix (e.g., per session).
Cost per block: This would be used if, for instance, you are offering a product that is sold in blocks of 1 hour at $25 per hour. A customer could order 4 blocks for a total cost of $100.
The next section allows you to set up discount rules based on block type or specific dates.
Add People/Participants in your Booking
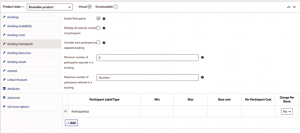
The WooCommerce Bookings and Appointment Plugin lets you add multiple fields to add participants to the booking. The following are the available options in the plugin settings.
Checking the Enable Participants box allows a customer to book something for more than one person at a time.
Multiply all costs by number of participants: The price of the product will be multiplied by however many people the user signs up during the transaction.
Consider each participant a separate booking: A separate booking will be created in the admin area for each individual signed up during the transaction, which is particularly helpful if you have limited spaces available.
Minimum/Maximum number of participants allowed in a booking: You can choose to allow a customer to sign up as few or as many people as they want during a single transaction
Below this is a section to set up other costs, if needed, as well as discounts (not shown in image) based on different Participant scenarios.
Booking Resources

Checking the Enable Resources button allows you to offer additional resources to the customer (e.g., choice(s) of breakfast and/or dinner with a room reservation).
Resource Type: You can allow customers to choose as many as they want or only one from a list of resources (e.g., choose only breakfast, only dinner, or both).
Resource Label: A description of what is being offered.
The box below this lets you add the names of the resources you are offering and the cost, if there is one. You can also automatically assign a resource to a customer or let the customer choose.
Booking Assets

This was actually the most complicated tab – probably because it handles more complicated scenarios (e.g., if a customer books Product A, Product B needs to be booked for the same time; different staff members are available at different times, etc.). Generally, it’s used to ensure that two clients could not book the same time for a session. This is implemented through the Settings tab (see screenshot) under Bookings, and once it’s set up, you simply assign the Asset to the product(s) – see below.
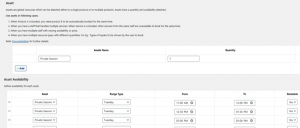
The remaining tabs for Bookable products are the same as for Simple Products (link to Product & Service Sales – WooCommerce).
Smart Bundles
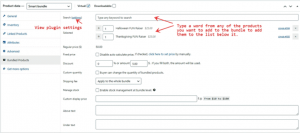
The ability to bundle products together at a discounted price can be implemented using the WPC Product Bundles for Woocommerce plugin. To view the Settings in place on your website, from the Dashboard, left column select WPClever → Product Bundles from the admin menu.
After choosing Smart bundle from the dropdown, the Bundled Products tab will show up below it. Once again, you want the Virtual box checked.
Search: Enter any keyword from an existing product, and a list will pop up with all the products that have that word in them. Click the “+” sign next to the product to add it to the bundle list.
Regular price ($): This will be automatically calculated by the system to show the cost for both products at full price.
Fixed price: If you check the “Disable auto calculate price” box, you can set the sale price for the bundle manually on the
General tab.
Discount: If you choose to let the system auto calculate the price, you enter a percent discount or a set dollar amount to deduct from the regular price.
Custom quantity: This option allows customers to choose the number of each product to add to their bundle.
Shipping fee: You won’t need this unless you start selling physical products.
Manage stock: Checking this box allows stock to be automatically calculated based on the bundled products’ stock levels.
The remaining fields are for adding any custom text to the product page.
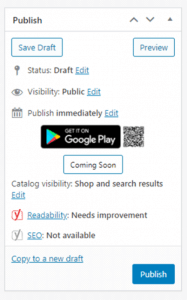
“COMING SOON”
This feature is also the result of a special plugin…
If you want to give customers an advanced preview of products that are not quite ready for purchase, you can enter all the product details, publish the page, and use the Coming Soon button to prevent it from being purchased. It basically changes the Register button to a button that says Coming Soon.
Shortcuts
If you have a lot of similar products, there is a shortcut you can use to enter them. On the Products page, under the name of each product, are some links, and one of these is a Duplicate link. Clicking will create a new product that is an exact copy of the original. You just need to edit the new product and change the Title, Descriptions, and any other info that might be a little different. Just remember to duplicate a product that is in the same category as the one you are adding (i.e., duplicate one of the Bookable products when creating a new Bookable product, and so on).
OTHER RESOURCES
Woocommerce documentation: https://docs.woocommerce.com/
Plugin Hive Bookings & Appointments documentation: https://www.pluginhive.com/knowledge-base/setup-guide- woocommerce-bookings-and-appointments-plugin/
