April 24th, 2021
How Can We Help?
Music & Audio
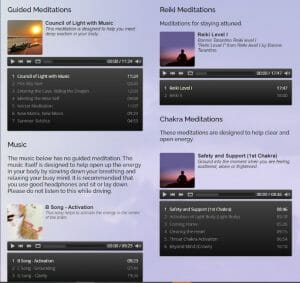
We’ve had the opportunity to design websites that serve as a collection of media tools for audio and video. We’ll use BonnieTarantino.com as an example.
For client administration, we generally create a special WordPress template for a page such as this one. When viewing the editing screen, you’ll see that each section has a unique text layout. Within those text blocks you’ll notice “shortcode” that looks similar to this:
[wonderplugin_gallery id=4]
This code “calls up” a specific player on the page and we’ve formatted it in a way that meets client needs and wishes. Read on for “how-to” info.
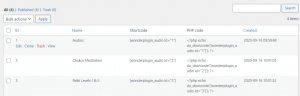
EXAMPLE: Wonder Audio Player Pro → Manage Audio Players → Audios
Adding NEW Audio Files
Unlike video files, which are typically best handled through YouTube, audio files need to be optimized for the smallest file size possible while maintaining good quality, then uploaded to the site through the Media Library. This can be challenging at times but this tool adds a large amount of authenticity to your site so it’s worth it. We recommend MP4 format and it helps to have a medium-sized thumbnail image ready to go with it (square 300px X 300px is preferred).
To add a NEW audio file, open the appropriate file name/ID (mouseover, “Edit”) and from the “Edit Audio Player” screen click the “Add Audio” button appearing right above the first audio file in the series. When the panel opens click the “Upload” button to the right of the Mp3/4 file field.
Locate the file on your computer and upload. Once the upload finishes, select it and click “Insert” or “Ok.”
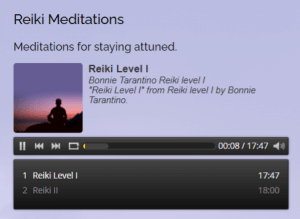
Add the audio thumbnail image by uploading or retrieving from the Media Library. Next add the Title of the audio. You can skip down to the “Information” field, which we sometimes style with italics (see right).
Next step is to add the audio “duration” which can generally be obtained from the file itself or if not, from any converter used to format the file. (You can also find this using “Properties” on your local computer).
Next is to move the audio file into the appropriate spot in the order of your audio files. These are drag and drop or you can use the “Move Up and Move Down” feature. FINAL step is to “Save & Publish” (blue button). You can also “Preview” the player using the button next to it.
Editing
To edit an existing player click “Edit” under the appropriate ID. There you can change the list title or edit/add audios to the play list.
To EDIT an individual audio file click the “Edit” link located under the thumbnail image and title. There you can replace the MP3 audio file (URL) with another upload, change the title, audio “Information” or duration of the audio file in seconds (can be found using the files “Properties, Details” on your local computer).
Be sure to click “OK” if you make changes, or “Cancel” if not.
Creating a NEW Audio Player
There won’t be many occasions where you’ll need to create a new player BUT it IS possible administratively. The easiest way is to “Clone” one of the other players using the tool located in the mouseover group when you hover over the ID numbers. Once you’ve cloned a player you can go through and delete all but one of the existing audio files, leaving that one to copy from. When you have your new files uploaded remove that leftover, save and you’re good to go. After the player has been created, grab the “shortcode” from the player list, paste it into your page and voila! If all else fails you can drop us a note and we’ll jump in to help asap.